Tuesday, January 27, 2015

Little Coin Clutch


Some time ago, my mom gave me some batiste fabric. I wanted to use it to make something special. After giving it a lot of thought, I decided to make this coin clutch for a special Christmas gift. 
 I used the batiste for the embroidery part and cotton fabric for the lining. I bought the clutch closing at Joann's. It was an adventure making it!
 I was in the middle of some other projects and I had to take care of my kids and my beloved husband. I could not believe it when I finished it.
I enjoy making it!
Always take time to make something special for those you love!


Friday, December 5, 2014

Two months of exploring

This past two months (October - November) has been an adventure. As always, I had everything plan to start a new project, a shoulder bag. I was inspired by the butterfly stitch sample, but nothing of that happened.

First, we received the lovely visit of my mom. She came for her annually two weeks vacations. So, my husband planned a vacation in Colorado Springs, CO. It was a beautiful and exciting time. Then, my aunts decided to come too.  They arrive three days after my mom left our home.

As I had shared before, my mother was the one who taught me the majority of thing I know about crafting. And I would not be fair if do not give credit to my aunts too. All of them, my three aunts and my mom, we would get together to make crafts for special events (wedding, birthdays, etc.). So, you can imaging how excited I was when I got the news that they were staying with us for a month and a half!
Everyday was an adventure, one of my aunts makes jewelry and the other one do crochet. We went to every craft store we could and started as many projects we could.


One the projects I did was an amigurumi owl. I have to confess that I tried crochet when I was younger, but it did not capture my attention at all. Last year one of my aunt tried to teach me again, but it was not a success, but this year I fell in love with this project. Neither my aunt or me knew how to read the crochet instructions, but with a little intuition and YouTube help, we figure it out.


I got so confident, that I even try this other little guy that I found in Pinterest.  I'm in love with crochet now! I just started a new crochet hat and I have plan to make some other things to give as Christmas gifts.

I have to admit, everything did not went how I planned it... It just went better!


Friday, September 19, 2014

Stitch Sample

Lately, I've being seen so many stitch samples out there that it inspired me to practice my stitching in different ways. One thing I have learn is that you will never stop learning and practice makes perfect!

My older daughter loves butterflies, so I decided to make a butterfly stitching sample.
I started by cutting two pieces of fabric and a piece of felt to place in the middle of the two pieces. I'm old fashion and I do not like to see the ugly back of my stitches.   
Then I marked every stitch in place and embroidered it. I did satin, feather, running, lazy daisy, chain, stem, herringbone, cross stitch and blanket stitch around it to sew together both fabrics. 


 I love the finish project! The colors are vibrant and rustic at the same time.
It's very bohemian or gypsy style, which it has inspire me to make a shoulder bag.


I will be posting pictures of the shoulder bag as soon as I finish it. I can not wait to start!

Friday, September 12, 2014

Lion Pin

Lion pin

One morning my daughter asked me to do her hair in a way she can wear her elephant hair pin. After I did it, she was so happy that she asked to take a picture and send it to my friend who made it for her.  Then she asked me if I could make a lion bow for my friend's granddaughter.  I said yes without having any idea of how I could make it. After a little praying and thinking, this is what came out of it.

I made a daisy with the ribbon just like before. 1 ½" wide and I went 15 times around the rods of the bow maker. Sewed it in the center and glue a yellow ribbon loop on top of it.  I made two little loops for the ears. Glued the eyes and embroidered the nose and mouth. I glued an alligator pin on the back. 

Have fun creating!

Friday, September 5, 2014

Ribbon Flower - Daisy


Today I want to share with you a tutorial of a daisy made of ribbon I saw on the internet. I search for a tutorial and did not find it, so I decided to do it a tutorial. This one is specially made for a special friend who loves making bows for her granddaughters and friends.


Materials


Bow maker
(My husband bought me this bow maker on Ebay for less than $10 and free shipping)

¼" wide ribbon
Hot glue gun
Button
Scissors
Tapestry needle 
   (You can use the biggest and sharp needle you have)
Thread


First of all I decided the size of the flower I was going to make. Then I moved the rods of the bow maker to meet that size. My flower is 1 ½" of diameter. Then I place the needle in the center of both rods. I place the needle with some facial tissue to make the needle stable enough to work on it.  Make sure the needle is threaded before starting or else it would be difficult to do it later. Trust me on this one! Hahaha!
Next, without cutting the ribbon, I started in between the rods, piercing (securing) the ribbon with the needle and going around the rods. I went around each rod 15 times. You can do it as many times you like. It would look more thick as more you go around. 

NOTE:
Do not forget to secure the ribbon in the center every time you cross in between the rods.


When you finish that last step, you are going to pull the needle through the ribbon and take the ribbon out of the ribbon maker. 

NOTE: The needle should be thread it and the thread should be knotted at the end to prevent to go through without holding the ribbon.

Working very carefully, twist the ribbon to the sides forming the daisy.  Sew the center of the daisy when you feel satisfied with the look of it.
At this point, you can glue the button in the center or make another one, smaller or the same size to make it look fuller. 


I made two daisies and glue them together. The bigger one is 1 ½" wide and I went 15 times around the rods of the bow maker and the smaller one is 1" wide and I went 10 times around the rods.


 I hope you like it and want to try to make this beautiful flower. You can sew it to a dress, glue it to a hair pin or headband or use it to accent any piece of decoration.

Friday, August 29, 2014

Beads!


One of my favorites crafts is embroidery, but the one that stole my heart was bead embroidery.
At one point in my life I decided to go back to school and take sewing classes at college. As a part of the course, I had to take a bead embroidery class. It was my favorite class ever. I already knew how to embroidered with stem stitch, but I had never tried embroidering with beads. 

I started experimenting with round and tubes beads, little pearls, sequins and ribbons. I learned how to use this technique from simple napkins or handkerchief to a cathedral wedding veil.

These are samples I made in college


I hope this will awaken your curiosity on embroidery that its an art expression that can be done in different ways. 

Monday, August 12, 2013

Lemon Cupcakes

This is one of my easiest recipes ever! Delicious and simple is my motto when I'm in the kitchen.

Lemon Cupcakes

Make 12 - 18

Ingredients:
1/2 cup (1 stick) unsalted butter
1 cup sugar
3 eggs
1 teaspoon vanilla
lemon zest of one lemon
1 cup self-raising flour

  1. Preheat the oven to 325 degrees. It will take longer, but it will bake evenly and fluffy cupcakes.
  2. In the mixer bowl cream the butter and sugar together.  This will make the cupcakes fluffy.
  3. Add the eggs (one at a time), vanilla and lemon zest.
  4. Add flour and stop as soon it's all mixed. Do not over mix it! You will end with very hard cupcakes. Not cool!
  5. Divide evenly in the cupcake liners and place the cupcake tin in the oven for 15 to 20 minutes.(Every oven heats differently, so do not leave the cupcakes unattended.)
  6. When the cupcakes are done, let them cool and then decorate them as you want.
My daughter loves to put some icing on them and sprinkles.
Happy baking!

Friday, June 21, 2013

Fondant Decorated Cookies

This is a simple tutorial of how to decorate sugar cookies with fondant.
Materials
Sugar Cookies
Cookie cutter (the one used for the cookies)
Fondant
Texture tile
Rolling pin
Rolling mat (it could be a regular plastic placemat)
Water
Brush
After making the cookies, color the fondant with the colors you want.  This time I was making cookies for a baby girl's shower, so I chose white and pink for the stroller cookies.

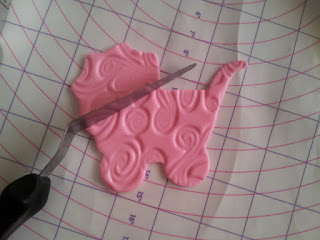
I rolled the fondant and pressed it with the texture mat.

I cut the fondant with the same cookie cutter I used for the cookies.
  

I cut a piece of the design, because I wanted to make it in two colors.
I repeat the process with white fondant for the top part. (Without using the texture tile.)


Last, I glued the fondant to the cookie brushing the back of the fondant with water.


I place them in a plastic bag and gave them as the games prizes.

Thursday, June 6, 2013

Embroidery - Burp Cloth

Embroidery, one of my favorite craft. 
I want to share with you a basic project I did for my baby's burp cloth.


This is the list of materials I used for this project.


Embroidery hoop
Needle
Thread
Pattern (drawing)
Iron-on transfer pencil
Fabric ( I used a 3-ply cloth diaper)


The first thing I did was transfer the pattern to the fabric.  I trace the image with the transfer pencil on the back of the pattern.


I iron the fabric and then press the pattern in the fabric (I set the iron on cotton).  Always remember to not move the pattern when your pressing it into the fabric or else the image will came double and it will be difficult to work with.


I place the fabric on the hoop and embroidered with the Stem Stitch.

This is a link where you can find a tutorial of how to learn to make the stem stitch.

Embroidery Stitch Video Tutorial: Stem Stitch

I hope you like this project as much I do and try to make your own creations.  Remember you can use this technique to make house decorations, embellish clothes, etc.

Please, share your projects with us .

Tuesday, May 28, 2013

Oatmeal Cookies

Today I want to share one sweet recipe that my husband and friends love.
Oatmeal cookies! 
This recipe is super easy and the dough can be stored in wrap paper or in a airtight container for up to 2 weeks. 


Oatmeal cookies

Ingredients 


Makes about 3 dozen

  • 2 cups all-purpose flour
  • 1/2 teaspoon salt
  • 1/2 teaspoon ground cinnamon
  • 1 teaspoon baking powder
  • 1 teaspoon baking soda
  • 1 cup (2 sticks) unsalted butter, room temperature
  • 1 cup packed light-brown sugar
  • 1/2 cup granulated sugar
  • 1 tablespoon pure vanilla extract
  • 3 tablespoons milk
  • 2 large eggs
  • 3 cups old-fashioned oats
  • 1 cup raisins

Directions


  1. In a medium bowl, whisk together flour, salt, cinnamon, baking powder, and baking soda. Set aside.
  2. In the bowl of an electric mixer fitted with the paddle attachment, combine butter with both sugars, and beat until light and fluffy. Add vanilla, milk, and eggs, and mix well.
  3. Add flour mixture, and beat until just combined.
  4. Remove bowl from the electric mixer, and stir in oats and raisins. Place dough in the refrigerator until firm, about 2 hours or overnight.
  5. Heat oven to 350 degrees. Line several baking sheets with parchment paper, and set aside. Scoop out 2 tablespoons of dough, and shape into a ball; place on one of the prepared sheets. Repeat with remaining dough, spacing balls 3 inches apart. Press down to flatten into 2-inch diameters.
Transfer to the oven, and bake until golden but still soft in center, 16 to 18 minutes, rotating the pans between oven shelves halfway through baking. Remove from oven, and place on a wire rack to cool completely. Store in an airtight container at room temperature up to 1 week.

Let us know how much you like these cookies!