Monday, August 12, 2013

Lemon Cupcakes

This is one of my easiest recipes ever! Delicious and simple is my motto when I'm in the kitchen.

Lemon Cupcakes

Make 12 - 18

Ingredients:
1/2 cup (1 stick) unsalted butter
1 cup sugar
3 eggs
1 teaspoon vanilla
lemon zest of one lemon
1 cup self-raising flour

  1. Preheat the oven to 325 degrees. It will take longer, but it will bake evenly and fluffy cupcakes.
  2. In the mixer bowl cream the butter and sugar together.  This will make the cupcakes fluffy.
  3. Add the eggs (one at a time), vanilla and lemon zest.
  4. Add flour and stop as soon it's all mixed. Do not over mix it! You will end with very hard cupcakes. Not cool!
  5. Divide evenly in the cupcake liners and place the cupcake tin in the oven for 15 to 20 minutes.(Every oven heats differently, so do not leave the cupcakes unattended.)
  6. When the cupcakes are done, let them cool and then decorate them as you want.
My daughter loves to put some icing on them and sprinkles.
Happy baking!

Friday, June 21, 2013

Fondant Decorated Cookies

This is a simple tutorial of how to decorate sugar cookies with fondant.
Materials
Sugar Cookies
Cookie cutter (the one used for the cookies)
Fondant
Texture tile
Rolling pin
Rolling mat (it could be a regular plastic placemat)
Water
Brush
After making the cookies, color the fondant with the colors you want.  This time I was making cookies for a baby girl's shower, so I chose white and pink for the stroller cookies.

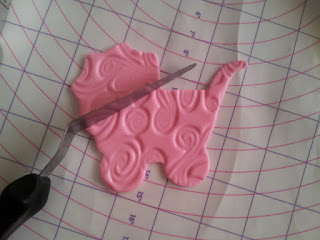
I rolled the fondant and pressed it with the texture mat.

I cut the fondant with the same cookie cutter I used for the cookies.
  

I cut a piece of the design, because I wanted to make it in two colors.
I repeat the process with white fondant for the top part. (Without using the texture tile.)


Last, I glued the fondant to the cookie brushing the back of the fondant with water.


I place them in a plastic bag and gave them as the games prizes.

Thursday, June 6, 2013

Embroidery - Burp Cloth

Embroidery, one of my favorite craft. 
I want to share with you a basic project I did for my baby's burp cloth.


This is the list of materials I used for this project.


Embroidery hoop
Needle
Thread
Pattern (drawing)
Iron-on transfer pencil
Fabric ( I used a 3-ply cloth diaper)


The first thing I did was transfer the pattern to the fabric.  I trace the image with the transfer pencil on the back of the pattern.


I iron the fabric and then press the pattern in the fabric (I set the iron on cotton).  Always remember to not move the pattern when your pressing it into the fabric or else the image will came double and it will be difficult to work with.


I place the fabric on the hoop and embroidered with the Stem Stitch.

This is a link where you can find a tutorial of how to learn to make the stem stitch.

Embroidery Stitch Video Tutorial: Stem Stitch

I hope you like this project as much I do and try to make your own creations.  Remember you can use this technique to make house decorations, embellish clothes, etc.

Please, share your projects with us .

Tuesday, May 28, 2013

Oatmeal Cookies

Today I want to share one sweet recipe that my husband and friends love.
Oatmeal cookies! 
This recipe is super easy and the dough can be stored in wrap paper or in a airtight container for up to 2 weeks. 


Oatmeal cookies

Ingredients 


Makes about 3 dozen

  • 2 cups all-purpose flour
  • 1/2 teaspoon salt
  • 1/2 teaspoon ground cinnamon
  • 1 teaspoon baking powder
  • 1 teaspoon baking soda
  • 1 cup (2 sticks) unsalted butter, room temperature
  • 1 cup packed light-brown sugar
  • 1/2 cup granulated sugar
  • 1 tablespoon pure vanilla extract
  • 3 tablespoons milk
  • 2 large eggs
  • 3 cups old-fashioned oats
  • 1 cup raisins

Directions


  1. In a medium bowl, whisk together flour, salt, cinnamon, baking powder, and baking soda. Set aside.
  2. In the bowl of an electric mixer fitted with the paddle attachment, combine butter with both sugars, and beat until light and fluffy. Add vanilla, milk, and eggs, and mix well.
  3. Add flour mixture, and beat until just combined.
  4. Remove bowl from the electric mixer, and stir in oats and raisins. Place dough in the refrigerator until firm, about 2 hours or overnight.
  5. Heat oven to 350 degrees. Line several baking sheets with parchment paper, and set aside. Scoop out 2 tablespoons of dough, and shape into a ball; place on one of the prepared sheets. Repeat with remaining dough, spacing balls 3 inches apart. Press down to flatten into 2-inch diameters.
Transfer to the oven, and bake until golden but still soft in center, 16 to 18 minutes, rotating the pans between oven shelves halfway through baking. Remove from oven, and place on a wire rack to cool completely. Store in an airtight container at room temperature up to 1 week.

Let us know how much you like these cookies!

Tuesday, May 14, 2013

Bobbin Lace (Mundillo)

This past February we took a surprise vacation on our beautiful island Puerto Rico. My husband and I were born there, so we try to go and visit our family as often as we can.

While visiting our family, my mom talked to us about a museum she was dreaming to go for years, so we decided to take her to the Bobbin Lace Museum.


In the town of Moca, PR there is a museum of Bobbin Lace (Mundillo in Spanish). Bobbin Lace is the art of making lace for baby and adult clothes. In the 1920's and 1960's it was one of the more important industries in the economy of the town.  The women worked from home or in factories, and the production was exported to the USA, mostly to New York.  Time has passed and this beautiful art is still alive, even when is not the big industry it was in the past.  Throughout the island you can find a lot of bobbin lace makers, mostly in the west of the island.


To make the bobbin lace, the necessary materials are bobbins, thread, pins, and a pattern. The lace is worked on a loom or the "mundillo", which is a box with a pad where you place the pattern. This pad should be rotated to complete the lace as the piece is getting done .

MUNDILLOS


 The lace can be use to create earrings, house decorations (tablecloth, window curtains, blankets, etc.) and clothes.


Tuesday, January 29, 2013

Amish Frienship Bread


Ten days ago I received, for the first time in my life, an Amish Frienship Bread Starter. Someone gave it to my aunt and she made starter for friends and for our family.  Is a very delicious and very addictive sweet bread, she said to me. So I accept the challenge and made it. I have No regrets!


Because I wanted to share it with some friends I did the ten days process to multiply the starter.  It wasn't hard at all.  During few days the only thing I did was mash the bag where the starter was.  Day #6 and I added a cup of milk and flour. Then continue mashing the bag every day until the day #10.


Day 10 was my husband favorite day! I divided the starter in 7 bags and made the bread.

It's so easy, just put every ingredient in a plastic o crystal bowl, mix and divide in four loaf pan.  The one my aunt made have golden raisins and nuts, so I decide to make three of my loaf like that. The last one I put chocolate chips in it, simply delicious.